Tuesday 4 December 2012

Bowl full o' Dragons


So it's been awhile. Life has come along and rendered me incommunicado due to traveling, studying and moving house, but now I am free! Free of study for the semester and almost settled into the new place, so it's time to give y'all the most amazing, healthy, delightful and healing recipe in the world, The Dragon Bowl! Trust me my friends, you will not be disappointed!

Dragon Bowls are macrobiotic by nature and follow the basic principles of balance, taking into account the basic food groups which acheive said ultimate balance naturally: (in order of greatest portion size first) whole grains(rice), vegetables(salad, radish coleslaw, yam), enzymes(pickles, miso soup), minerals(seaweed, vegetables), Beans(tempeh), condiments/oils(gomasio, sesame paste or tahini sauce). (see the bottom for the Macrobiotic food pyramid and some other great links).

This recipe may seem involved, but once you gather all of the bits and pieces it really is a matter of assembling. So with the main bowl of food, you need some condiment (which contains your oils/salts/minerals), so I made a delicious sesame paste which you may like to try. If you are not into it, you can make some tahini cream or even just use Tahini as your condiment. Either way both are full of sesame which is full of calcium. And, delicious.

Sesame Paste:
- 4 Tbsp Black or white(or a mix) sesame seeds(pre dryroasted)
- 1.5 tsp Tamiri
- 1 tsp Mirin
- 1 tsp rice vinegar (or use sushi vinager but hold the mirin)
- 1/2 tsp rice syrup(or sugar)
- Bit of water if needed

Black and white Sesame paste

 Dragon Bowl Ingredients


Method 
Grind sesame in a mortar and pestle until squished but not completely powdered. Mix in the liquid. If too chunky, add a little water. Yum and easy.


All ingredients set out and ready for assembly
(the following list of ingredients are already cooked in their normal everyday way.. Any questions, comment me below)

- 1 or 2 cups of cooked rice(1 or 2 depending on how many you are cooking for. I used red rice, but feel free to use brown, black or wild, but steer clear of white please)
- 1/2 block of Tempeh (cut into small chunks and gently fried with a few drops of tamiri and Yam below)
- 1/2 large Yam (red,purple, white - cooked with tempeh, as above)
- Bowl of coleslaw (purple Cabbage, purple/orange carrot and daikon, chopped/mixed no condiment)
- 2 sheets of Nori, torn into little bits
- Miso soup (1 serve per person. I like the Sprial foods organic Miso soup)
- Organic or homemade pickles. I've used the Spiral foods pickled ginger.
- Handful of Shitake mushrooms (Use dry ones, soak in hot water for about 30 minutes. Drain off water)
- Seaweed salad mix. Made as per package instruction. Try to get one that is only sea vegetables and no added extras.

- Bean spouts
- Salad leaves

Once you have all of the ingredients cooked and set out, the hard part is over! Let the assemblage begin!

Assemble your Dragon Bowl

Step one: Take a nice sized bowl and quarter fill it with room temperature or luke warm rice (not piping hot and not cold from the fridge). Start to add small amounts of all of your salad like ingredients on top of the rice. This includes the sprouts, pickles, coleslaw, mushrooms, nori and seaweed salad. Place each ingredient in a circle around the edge of the bowl leaving a space in the middle.


Step two: Add the cooked tempeh and yam into the middle space, as though they are the main attraction.


Step three: Line the edge of the bowl with salad leaves, so you can still see the main attraction poking through.


Serve with a mug of miso soup and a dollop(or two) of the delicious sesame paste. Now Eat it!

And there you have. The amazing, seemingly complicated but actually easy, Dragon bowl. I cannot say that you will be spitting flames after eating this, but I can say you will feel like you can fly!

Fly free little Dragons! Fly Free!

_______________________


The following is the Macrobiotic food pyramid:

Macrobiotic Food pyramid -The kushi Institute 

Macro Links:
http://www.kushiinstitute.org/
http://www.macrobiotics.co.uk/
http://hipchicksmacrobiotics.com/
http://www.macrobioticcooking.com/

Monday 11 June 2012

Sesame sugarfree Anzacs!


Anzac biscuits are the best. They are delicious, sweet, chewy, incredible. But with sweet comes sugar and too much sugar makes me twitch twitch twitch. So, in an attempt at a friendly anzac biscuit, I modified your everyday recipe, keeping it just as easy as normal but now more blood sugar friendly. You'll like them as much as these pups, no doubt.

Recipe:
1 cup rolled oats
1 cup GF or plain flour
1 cup dessicated coconut
3/4 cup Rice syrup
2/3 cup vegan margarine 
2 Tbsp sesame seeds
1 tsp bicarbonate of soda
1 - 2 tbsp boiling water

Method:
Heat oven to 180 C. Grease 2 baking trays.
 In a large bowl mix together the oats, flour, sesame seeds, coconut and rice syrup. Melt the margarine in the microwave and add the bicarb soda and the 1 Tbsp boiling water(the other Tbsp may be added later if it's all too gluggy). Pour the mixture into the dry(ish) ingredients and mix well. Roll the mixture into balls (slightly smaller than golf ball size). They will still be very soft when you remove them from the oven so let them cool slightly on the tray first before placing on a cooling rack. 

Give them to your friends or family, or eat them all yourself! Yeah, just eat them all yourself. You don't need to feel guilty about these ones.

Johnny Cakes, Johnny Cakes!


Corn is awesome. But being able to say 'I'm making Johnny cakes', that's even more awesome. What a cool name! These Johnny cakes are corn pancakes though we had them for dinner with veggies and some beans and quinoa, but you can easily have them for breakfast smothered in maple syrup or nutelex. Do as you please, but I will tell you this, these hi-fiving Mofo's are enslaving..

Recipe:
1 cup Fresh corn (I like it off the cob, though you can use canned or frozen if you want)
1 cup Rice milk
1 1/2 cups gluten free plain flour (or cornmeal if like)
1 tsp Baking powder
1/2 tsp Baking soda
1/4 tsp salt
2 Tbsp Maple syrup
2 Tbsp olive oil
2 Tbsp fresh lemon juice
Olive oil spray for cooking

Method:
In a processor, pulse the corn and rice milk a few times, just to get the corn a bit chopped up. Add all remaining ingredients and blend for about 7 seconds, or until combined. There should still be chunky pieces of corn left. Let the batter rest for around 10 minutes, and in the meantime, preheat a good Fry pan over medium heat.


Spray the pan with oil and using an ice cream scoop, ladle out a few johnnycakes. Cook for about 3 minutes, the underside should be crisp and browned, the top still wet. Flip the cakes (spraying the pan as you lift each cake. This is important as corn loves to stick!) and cook until crisp and flecked with brown. Keep finished cakes on a plate covered with tinfoil as you prepare the rest.

These little guys can keep in the fridge for a couple of days, but with a name like Johnny cakes, I doubt they will last that long! Palatable as heck!


Baked Golden Nugget of Bliss.


Little pumpkins. How amazingly cute are they? When I see them I just want to collect them up and put them on display or stroke them or kiss them or something ridiculous like that. But if you run around kissing tiny pumpkins you will get some unsavoury glances, so maybe we should cook them instead huh!

This is a Lee original, so you can feel free to change up the ingredients to suit  yourself, but I gotta say, this one was pretty darn delicious (Oh, and I cooked them in tiny casserole dishes as I accidental cut a hole in the bottom of one of the nuggets... whoops).

Recipe:
2 x Golden Nuggets(or more to suit)
Filling:
1 cup of cooked Quinoa
1/2 cup of cooked French lentils
3 Mushrooms chopped small
1/4 Carrot chopped small
1/4 Zucchini chopped small
1/4 Massle cube in 1/2 cup boiling water
few drops sesame oil
few drops of Tamari
1 ground clove of garlic

Method:
Preheat oven to 200 C. Chop top off the Nuggets and remove the seedy guts. Put aside.
Filling: In a saucepan add all ingredients. Cook on medium until everything is smooshy and cooked. You may need to add more water if mixture is getting too thick. Once Mixture is cooked fill the nuggets and put the lid on top. Bake in the oven for approximately 20-30 minutes. When pumpkin is soft it's good for eating! Serve with some steamed greens, like Broccolini and Cabbage. You gonna be happy it's Winter so you can eat this allllllllllll the time! So lucky!

NB. You will probably have loads of mixture left over. You can use this in savoury pies (tastes strangely like chicken), over mashed potato or in pasta. Go crazy!


Vegan Laksa surprise!


 Laksa. The idea is a scary one, no? It must be soooo hard to make! Well sweetheart, I'm here to tell you that indeed, it is not! It's one of the easiest dishes I've made, even if there was some therapeutic mortar and pestle repetition, I felt good making it and even better eating it! I love food that has hidden surprises, don't you! I got some inspiration from this Vegan Laksa recipe(thank you) but I modified it to suit my taste(ahem, my disregard of onions and coriander) so feel free to check out that recipe if you want an unbiased ingredients list.. Let's get Grinding!

Recipe for the Paste:
3 cloves of garlic.
3 red chillies.
1 tsp of cumin, ground.
1 tsp of ground turmeric.
1/2 tsp of ground cardamom.
1 tsp of ground fennel seed.
3 ground cloves.
1/2 tsp of cinnamon.
1stalk of lemongrass that has had the outer layers removed, so that you are left with the soft inside flesh of the stalk.
1 Tbsp of minced ginger.
1/2 tsp of salt.
1/2 cup of water.
20 or so leaves of Thai basil.
1/4 cup of cashews.


Method:
I found that listening to Nirvana's 'Bleach' really helped with the making of this paste. Give it a try! If your spices are not already ground, ground them all together in a Mortar and pestle. It's fun! Once all are ground, Blend all of these ingredients in a food processor(I have a miniature one which is great for this paste), scrape the sides down often so as to form a paste. Add the water a little at a time. When paste is as smooth as you can get it it's done! Paste will keep in a container in the fridge for about a month... Though, I bet it won't last that long!


Recipe for Laksa Soup:
2 Tbsp of the above paste.
2 cups vegetable stock.
250 mls of coconut cream or milk.
As much sliced fried tofu puffs as you like 
1 medium bunch of Two bunches of bok choy, cleaned and chopped into three or four parts.
3 or 4 mushrooms, sliced.
A handful of bean sprouts.
8 snow peas.
A serving of Rice vermicelli - Prepare as per instructions and set aside.

Method:
In a sauce pan, place the paste. Add the tofu, mushrooms and stock and simmer for about three minutes, until the tofu is looking a little on the cooked side. Add the coconut milk and heat through. Bring to the boil and simmer for about two minutes. You don't want to cook it too long because if you do, the fats in the coconut milk will break down and it won't be so creamy. 
Take two bowls. In each one, add half the bean sprouts, half of the noodles and then all the veggies on top of the noodles. Pour the soup mixture over the veggies. The heat from this soup will cook the veggies just right.

Take a soup spoon and some Chopsticks and get to work. Now, you tell me that you do not feel like you have just ridden on a rainbow after this toothsome dish! Mmm hmm!

Quinoa Sesame Pats.


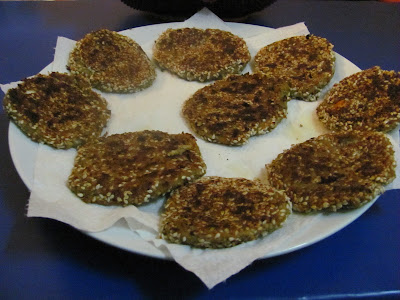
Do you ever look in the fridge and say 'well... What do I do with this Jumble of unrelated food stuffs?'.. Do you ever wish you could just throw it all together and it would turn out delicious? Well, I'll tell you, wishes CAN come true! These little joys are protein and calcium rich, gluten free and super amazing! You can make a whole stack and have left overs for lunch tomorrow! Sounds pretty good to me...

Recipe:
1 cup of cooked Quinoa
1/4 Cabbage
1 Carrot
1/2 Zucchini
1/4 average sized Daikon
1/4 cup Sesame seeds (+ more for sesame crumbs)
1 Tsp Chia seeds
Few drops of Sesame oil
Few drops of Tamari
1/4 massle cube (dissolved in 1 Tsp boiled water)
A little Gluten free rice crumbs(or Breadcrumbs or cornflake crumbs) 

Method:
Put all ingredients into food processor. Mix until ingredients become a gluggy chunky goo. Take a Tsp of mixture and shape into a flat pat. Pat the flat pat into a combined mixture of Rice crumbs and sesame seeds for a nice crispy coating. Fry on medium heat in a little olive oil, flipping at 5 or so minutes. You want both sides to be nice and golden.

We had these little joys with a large serving of steamed vegetables. But you can have them how you like. With veggies, with salad, for breakfast or lunch. Maybe even increase the patty size and you have a burger! WOW! Trust me, after you get this in your belly, you will invincible!


Saturday 14 April 2012

EZE CHEEZEEE Tatterbake!


If you tell me you hate potato bake, you are a liar liar, pants on fire and you owe me $10! Potato bake, I believe, is one of the worlds most comfortiest of comfort foods and it makes any meal become a little more mealier. Becoming a vegan I kinda let myself believe I could live without the delights of creamy, cheesy potato bake, but time proved to me that I cannot and food imagination showed me I do not have to! We all need a little food hug sometimes.

So I made up my own recipe. It is cheesy(ish), warm and delicious. You are going to wish it were Autumn so you can eat it all the time! Oh wait! It is!


Recipe: 
2-3 Large potatoes
1 cup rice milk
1 Tbsp coconut oil
1 Tbsp French onion soup powder + 1/2 Tbsp for topping
1 Tbsp nutritional yeast flakes + 1/2 Tbsp for topping
1 tsp sweet paprika

Method:
Preheat oven to 180 degrees. Peel and slice potatoes, about 3mm is probably a good thickness. Put them in a casserole dish. In a blender mix the rice milk, oil, french onion soup powder and yeast flakes. Blend until it is an even consistency. Poor mixture over the potatoes and stir a little to get an all over coverage. Sprinkle the remaining 2 x 1/2 Tbsp of soup powder and yeast flakes and the paprika on top. Pop on the lid and place in the oven for about 35-60 minutes(depending on your oven), or until it is nice and golden on top.

Serve with some steamed veggies and maybe some fried Tempeh.

Mmm. Hmm.. And If you do not find a loving culinary hug in this bake, I'll give YOU $10!


Saturday 31 March 2012

Pierogi! Ahem, Pyrohy!


Oh. God. Pierogi's. My heart. Melts. Just thinking about you.. I was introduced to these little bundles of pure sunshine many many moons ago by one of my greatest friends Talia; a Ukranain who once swore to me that she would attempt to eat at least 'one of every Animal in the world'.. Oh boy, I miss that girl. And so, in her honour I have created a vegan perogi, or as she would say, Pyrohy(pronounced, Pe-ra-hair).

(nb. Making pierogi's takes hours! So, I recommend making at least 100 per sitting)

Recipe:

- Mashed Potato
4-6 large potatoes
1/2 cube vegetable masell
1 large garlic clove
Milk and nutelex as required

- Dough:
3 cups plain flour
3 TBsp coconut oil
3/4 cup of water(or more)

Method:

 - Mash:
Boil the potatoes with crushed garlic until tender. Drain the water, add stock cube, nutelex, and “milk” to the potatoes, and whip everything until smooth. You want to get it nice and creamy, so try to work out all the big lumps.

- Dough:
Stir together flour, water, and oil until you get a workable dough. Knead for about three minutes, keeping your fingers wet to keep the dough from drying out.

- Assemble your pierogi:  
Grab a handful of dough and Roll out onto a floured surface using a floured rolling pin. The dough should be spread thin but sturdy enough to maintain without ripping. Cut circles in the dough using a egg round or a glass. Take about tablespoon of the filling and place it into the center of the dough. Fold into a crescent and pinch closed. You can use a fork to compress the seal if you like, it's all a matter of personal choice, either way, make sure the seal doesn't have any gaps, as this will keep the pototo from escaping during cooking(and leaving you with a limp dough sack). Set each one aside on waxed paper until you have all completed.

- Once all pierogi's have been assembled you can either Freeze them for later use (gently layer within waxed paper so they do not touch, freeze over night. Once frozen you can transfer them to plastic bags or containers) or COOK THEM!


 - Cooking your pierogi: Boil a pot of water, then add the pierogi. Boil for about five minutes, or until each pierogi floats to the surface of the water. Scoop out or drain off water. Add a kind dose of butter and leave it to melt for a minute or two. You can now chose to eat your little joy drops straight up (Maybe with some vegan cheese. Onions. Fakon. Soy sour cream etc) or you can Fry the suckers (gently until golden brown on each side).  Serve with some greens or other colours and INHALE! 


How many can you do?

Friday 2 March 2012

The New healthy eating plate.


The new Healthy eating plate courtesy of Harvard School of Public Health

The new healthy eating plate was released by the Harvard school of Public Health recently and it endeavours to show you a quick and easy guide into how each meal should be planned. The general healthy eating guide is 1/2 Vegetable(including a small amount of fruit) 1/4 whole grains and 1/4 protein. It also advises to limit red meat and avoid bacon, cold cuts and other processed meats and replacing unhealthy saturated fat with healthier unsaturated vegetable oils. Also not making a huge showing is Milk and dairy, in which you are also advised to limit... Interesting stuff huh! I have been trying to follow this general plate rule since becoming a vegan (thanks to the Kind diet) and find that it is so much easier to have a guide to go by.

Following you will see the new healthy eating pyramid as well as the age old eating pyramid. Noticing the changes that are being observed and recommended by such high nutritional authorities makes me pretty happy that people are starting to realise that animal and animal bi products are not necessary! All awareness is success!


New Healthy eating Pyramid


Previous USDA Food Pyramid

Wednesday 29 February 2012

Magic Mixed up Mash!


Leftoverssssssssssssssssssssssssssss! And laziness. Could well be a recipe for disaster, but instead I'm finding it a recipe for healing protein Magic Mash! While recovering from some sinus surgery I'm finding easy is best and if I can get in my proteins and greens quick and simple, I'll do what I have to, even if it means eating food that looks like something it shouldn't. No elaboration required.......

Magic Mixed up Mash!: (measurements are approx)
1 cup millet
1/2 cup quinoa
1/2 cup french lentils
1 cup leftover mixed mashed potato, yam and butternut pumpkin
2 Tbsp chia seeds
1/4 vegetable massel cube   
a few sprays of Braggs
2 tsp Olive or coconut oil for cooking

Method:
Mix all leftovers, seeds, massel cube and braggs in a bowl until nice and moshy(as usual, you can mix and match your grains and beans here. The variety I'm using is especially gentle, good for getting over colds, surgery and broken hearts!).  Heat oil in a large pan to medium-high heat, dump leftover goodness into pan and fry up until somewhat browned and crisp in places. When browned and crisp in places you are good to eat it as you please, directly from the pan or maybe serve it up with ume vinegar fried bok choy and zuchinni like I did and sit back and feel the magic healing hit you from the inside! Ziiiiiiiiiiiiiing!

Millet and Kale Krunchers!


So tell me, who doesn't like a little Krunch with your millet? Well I know I do and if you think about how good Millet is for you and how good Kale is for you, it only makes sense that they would embrace to make an amazingly delicious krunchy pattie for you to adore and treasure..

Millet and Kale Krunchers Recipe:
1.5 cups cooked millet
1 cup of chopped raw kale
1/4 cup sesame seeds
1/4 vegetable massel cube
Tamari to taste
Coconut or Olive oil to cook (2 Tbsp or so)

Method
Mix ingredients into a lovely mosh. Heat up oil to middle medium heat and dump large spoonfuls of the mosh onto the pan. Flatten the balls somewhat and leave to sizzle and cook until the edges start to brown, around 7 minutes. Be sure to wait for the browning of the edges as the patties are prone to separating if not crisped up enough. Flip krunchers and cook other side for another 7 or so minutes. Drain on paper towel a few minutes before serving! I served mine up with a seaweed, carrot and daikon salad. This meal is so tasty, you will definately forget that it is stupidly good for you too!


Tuesday 24 January 2012

Holy Macaroni!


"So. What do you miss most, being a Vegan?".. Oh. nothing at all really...

Yeah! Sure!  Cheese. Cheese. Cheese. Cheese. I miss it. I don't need it. I don't want it. But I miss that flavor. And I love mac and cheese and I don't care how unsophisticated that makes me. It is seriously special comfort food and you cannot tell me otherwise. Well, you can, but I ain't listening! On the net you will find a plethora of 'quick and easy!' 'Super amazing!' 'You can't tell the difference!' Vegan macaroni and cheese recipes. But who are we kidding, you can tell the difference, and I've tried a lot of those recipes and I always found they were too rich, too complex or too chunky. So what do you do when you have no answer? You make one up! So I made up a recipe which I love the most and I promise it really is 'Super amazing quick and easy Mac and cheese'! Also it contains no soy! Wow!

Holy Macaroni Recipe:
2 cups of gluten free macaroni or pasta (or normal pasta if you are so inclined!)
1/4 cup nutritional yeast
1/4 massel vegetable stock cube or a tsp of the powder stock
1 Tbsp Coconut oil
1/3 - 1/2 cup of rice milk (or equivalent soy milk if you like)
Salt or Tamari to taste if needed

Method:
Cook pasta as per instructions. If it is gluten free, remember to rinse, as sometimes it can be coated in weird 'glut-free' gunch. Drain and place back in saucepan. Add all the ingredients and stir with a wooden spoon over low heat until it is nice and creamy. You may want to add more or less Nutritional yeast, depending on your taste. I don't like it too tangy so I use a little less. Also, depending on how creamy/liquidy, feel free to add more or less 'milk' also.

And that's it. Takes about 3 minutes after the pasta is cooked and now you can put it in your Belly!

Saturday 21 January 2012

Okonomiyaki is your friend!


I love okonomiyaki. I would live on it if I could be bothered making it and didn't mind living on a fried food diet. But the thing about the little Japanese pancakes is that you really can experiment with the ingredients! The one above had a subtle Indian feel, thanks to the 1/2 tsp of curry powder that I shook in. So don't be conservative with this recipe! Go buck wild!

Okonomiyaki Recipe:
4 small purple Sweet Potatoes (Or 1 large sweet potato or Yam.)
1 large Carrot
4 inches of a large Daikon
1/8 Cabbage
1/2 cup of peas(I used minted. It's all I had.....)
1 cup plain flour (I used Gluten free)
1/2 tsp Baking soda
3/4 - 1 cup water
1/2 to 1 Tbsp Tamari (soy sauce)
2 tsp Mirin
Coconut oil for cooking
Condiments: Mayonnaise(Praise 97% fat free creamy is vegan!) and Terriyaki sauce

Method:
Using a food processor with grating attachment (I got one for Christmas. Thanks Mum!), Grate sweet potato, carrot, daikon and cabbage. Transfer to a large bowl and add peas, flour, baking soda, tamari and mirin. Slowly add water until it is all nice and juicy but not too watery. Heat up a large saucepan on medium with a little coconut oil. Dump a large amount of the mixture onto the saucepan, flatten until about 1/2 inch thick with a diameter of your hand. Cook for about 5-7 minutes until crispy around the edges and like a normal pancake, you see small bubbles in the mixture, Flip. Cook for another 5-7 minutes. Serve with Mayonnaise and terriyaki sauce. In restaurants they smother the pancakes with the stuff, but I like to have 'sauce choice' so I put the sauce on the side.

Eat up my friends!

Wednesday 18 January 2012

Deathrow meal request.... INARI!


I was thinking of doing a post on making sushi, but it is so darn easy, why waste the keystrokes? But something I don't think people believe is so easy, is the construction of INARI! Oooooh yes! I can eat this stuff until I am bursting at the seams with sweet rice. Imagine me, as a scarecrow, leaking rice and sesame seeds... Yep, that's me.....

First thing, Inari pouches seem to be a 'B' to make from scratch (listen, I haven't tried because the instructions scare me) so, just go to the Great eastern food centre on Russell Street, Melbourne (or your local Japanese grocer) and buy some pre-made! They are pre-juiced with sweetly goodness and ready to stuff! I picked up a 16 pack of Inari tofu pouches for $5.40! I've also seen them online, you can get a 40 pack for about ten bucks, but before purchasing this lot, remember, you have to eat them. I think like most tofu you should eat it within a few days of opening.

Inari recipe:

5 - 10 premade inari pouches (or 40 if you are really hungry. Quadruple rice recipe.)
1 cup of rice
1.5 cup water
Sushi rice vinegar
Salt
Roasted sesame seeds

Method:
To make Sushi rice:
Rinse rice. Combine 1 cup of rice with 1.5 cups of water in a medium saucepan. Add a pinch of salt. Bring to a boil, cover and reduce to a simmer. Leave to cook for 20 minutes without removing the cover. Once cooked, mix in 3 Tbsp of Sushi seasoning (or 2 Tbsp of sushi vinegar and 1 tbsp of rice malt or sugar. I buy the seasoning as it is premixed and amazing!)  Mix through with a wooden rice paddle. Leave to cool down to room temperature.

(Nb. or if you use a rice cooker, follow instructions as per your machine.)

To make Inari:
Gently open tofu pouch. Stuff full of rice. Sprinkle with roasted sesame seeds. And then......

GOBBLE GOBBLE GOBBLE

(KFC) Kindtucky fried Cauliflower!


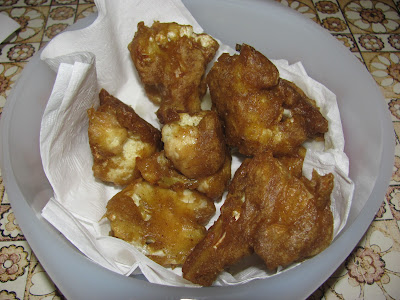
Yes. It's Vegan. And yes. It's So delicious. And yes. You can make this in no time at all! It is kinda heavy, but you gotta get in some fried treats now and then. Am I right, or am I right?

They're so stupidly easy to make! Kinda like a pakora or thick tempura. You can also substitute the cauliflower for any other vegetable, think broccoli, eggplant, yam(Yam!), zucchini. Amazing.....

Kindtucky fried Cauliflower Recipe:
Approximately 2 cups of haphazardly chopped cauliflower(or other yum vegetable)
Oil for frying
Batter:
1/2 cup all plain flower (I used Gluten free)
1 tsp curry powder
1/2 tsp salt
1/2 tsp baking soda
1/3 cup water

(optional: Add some spice during the cooking process. A shake of cajun, tumeric or some perhaps some 5 spice gives them a little tang! Just beware of MSG and salt content.)

Method:
In a large bowl, combine the flour, curry powder, salt, baking powder, and water to make a smooth, thick batter. It should not be runny. If necessary, add more water 1 to 2 tablespoons at a time. Mix well.

Warm 1/5 inch(or so) of oil in a large fry pan or skillet on medium heat. The oil is ready for frying when a drop of batter quickly crisps. Coat the cauliflower slices in the batter, and carefully place them in the pan to avoid splashing the hot oil. Don't crowd the pan. Cook until golden on both sides, turning once, for about 3 minutes on each side. Transfer to a paper towel to drain. Serve as soon as possible.

You can serve the little incredible bites with a nice chutney, or as I did, make a dip from some leftover dahl! Eat em up soldiers!

Recipe originally found here: Gluten-free/soy-free vegan